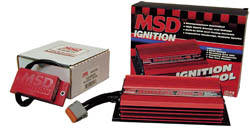
| -install is pretty basic,
tuning is the hard part. the diagram below makes install very
simple. As far as tuning goes a professional should always be
consulted. Estimated time: About 20 Minutes.
-
Make sure you have everything (MSD box,
harness, wire connectors, electrical tape, wire strippers)
-
Cut the wires about 1ft from the plug that
connects to the coil
-
Wire the msd harness as shown in the wire
diagram (its very easy)
-
Ground the black wire as close to the unit
as possible
-
Always use a fused lead for the power wire
(cigarette lighter wire works great)
-
That's it!
|
|
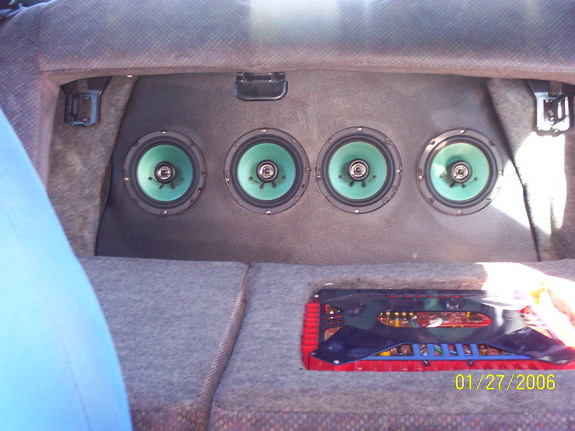
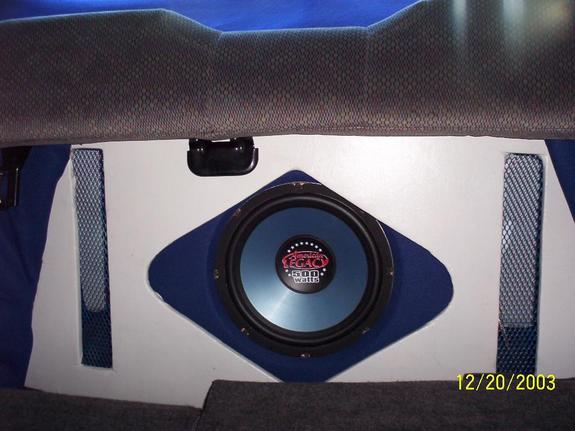
I have made many, they can be
cheap or expensive. Basic ones are not hard and can be made
relatively cheap while still looking good.
Materials: wood, jig saw, card board, material, spray glue,
staple gun, markers.
Estimated time: depending on complexity, at a
minimum expect a full day.

- I made a cardboard template of what I wanted, then
traced it on to the ply wood and cut it out.

.
- Using a sharp knife I cut pie shaped slits in the
material where the speaker will go, then stapled the pieces
to the back of the board
- I also made a false floor using the same steps as
stated above. Here is the finished product.

| Here are some other enclosures that I have made. |
|
|
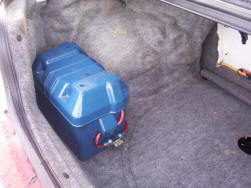
These are steps to making re-locating your
battery from under the hood to your trunk. Why? the battery
takes up allot of space, and many times gets in the way for a
cold air intake. With the battery gone it also allows easy
access to many parts of the engine. Here is a helpful hint.
DON'T BUY THE RELOCATION KITS! A simple and cheaper alternative
is a car stereo amplifier installation kit for a minimum 1,100
watts power handling. Think of this project as the opposite of
installing an amp, you will do all the same steps as instructed
in the kit except wire everything working from the trunk (as
under the hood) forward (as under the trunk).
Estimated time: about 2 hours.
-
Remove stock battery
-
Remove floor trim panels
-
Run a minimum 4ga wire from the trunk to the
fuse box, and replace floor trim panels.
-
Using a distribution block under the hood,
connect the main wire to the 4ga inlet, then with the two
other inlets connect the fuse box wire and the starter wire.
( I modified my battery tray to make a bracket as seen in
the pictures)

Back To Top
Plug and play. this is a very simple install
and a great upgrade to your ignition.
-
Remove your stock plug wired from the coil
-
Remove the Wire harness plug. first by
pulling the red tab away from the coil, and then press down
on the clip and pull
-
Remove the 4 bolts holding the coil in place
(remember which one's goes in the front and back, they are
different!)
-
Pull up on the coil and it will come off,
replace the stock coil with the MSD coil.
-
Replace the 4 bolts and then the wire
harness plug, finally re-install the spark plug wires.

Back To Top |
|
How To drive your neon
Shift at the redline, not at the torque peak!
Reason? Lets do some math.
P = F * V ...rearrange to get F = P / V (where F=force,
P= Power, V= Velocity.) That means that you get the maximum
force pushing the car if you maximize your *Power* at any
given velocity. This gives us another useful rule:
Shift to maximize engine POWER, not engine torque!
Here is the neon's power curve
RPM HP
1000 10
1500 19
2000 30
2500 44
3000 59
3500 76
4000 91
4500 107
5000 124
5500 139 (peak torque)
6000 149
6500 151 (peak power)
7000 147
As you can see the neon makes peak horsepower
at 6500 RPM, Although the neon can rev above 7000 RPM the torque
amount decreases. A car running at its (net) power peak can
accelerate no harder at that same vehicle speed. There is no
better gear to choose, even if another gear would place the
engine closer to its torque peak. You'll find that a car
running at peak power at a given vehicle speed is delivering the
maximum possible torque to the tires (although the engine may
not be spinning at its torque peak). This derives immediately
from first principles in physics.
Back To Top |